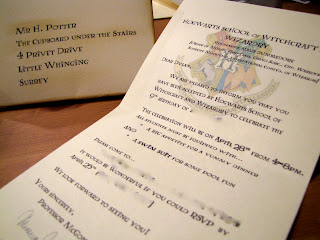
Right now I am nannying for a family with three Kids. Brennan, The 8 year old boy, wanted to have a Harry Potter birthday party and since I had seen some cute invitations on blogs from various creative party throwers, I offered to make some personalized invitations for him. I got this idea and the envelope template from Just another day in Paradise. After looking at a lot of variations this is the on I decided to tackle.
Materials:
Cream colored cardstock
Brown ink pad
double sided tape
Sealing wax- red
Seal- (I used one with an "H" for Hogwarts)
lighter (butane works best)
This is the envelope template that I used but I think, depending on the size you want, any would be fine. This template ends up being 4.5 x 5.5 and it is difficult to find an envelope to fit it in if you want to double envelope it for mailing.
Printing the name and address on every envelope was difficult because it took a lot of trial and error with the spacing. But it was worth it in the end I think. I like it better than having them written on there. I downloaded the "Lumos" font. It ONLY works on windows and you need one of the newer versions of Microsoft Word in order to have the rotating text box feature.
Make sure you print the name to where it will be right side up once the envelope is folded!!
I traced the template and cut out the envelope...
.. and then used the ink to make it look a little worn or antique-ish. On clearance at Michael's (where I bought all of the craft supplies) I found an "ink smudger" which ended up being REALLY useful because i couldn't get it to really look right with just my fingers but it isn't necessary and a cloth probably would have done the same job- It was just super cheap so I went ahead and got that.
I didn't go too crazy with the ink, I just used it to give a little character.
Fold up the edges based on the template. Once it was folded I ran the smudger with lots of ink across the edges and I was really happy with the effect that gave it.
Ta-Da
Then for the letter....
I found a Hogwarts "crest" online that I thought was cool and used it as the back ground to the letter. I faded it a lot so it looked more like a watermark but I raised it to the top of the page to accommodate for the shortness of the letter. (The normal watermark placement looked weird)
Here is the wording
I decided to smear some ink on the edges of the letter too.
Now, into the envelopes they go.
Here is a picture of one of the sealing wax sticks (the package came with 4), the seal, and lighter. The butane lighter really works well because the control you have with the flame really makes the whole thing go quickly!
I had never used sealing wax so it was a bit of an adventure. Please PRACTICE on an extra envelope or spare scrap of paper and NOT on one of the labored-over completed envelopes.
I watched a video on youtube to figure out how to begin going about it. Once I got the hang of it the seals went pretty quickly.
Final Product:
Overall I was pretty happy with how they turned out. I was really impressed by how cheap they were to make. The sealing wax and seal were definitely the most expensive part ($5 for the wax and $5 for the seal). Overall I spend $16 and could have probably made 20 invitations with the supplies. I only needed 10 but it wouldn't have been any more expensive to make double. They are probably a little more expensive that a themed store bought invitations but I think this sets an exciting vibe and gets the kids excited about what magic they might discover at the party


