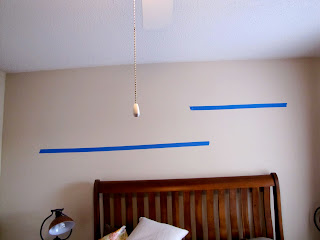
One of the many things I am glad that Simon and I have in common is our style. We both like old or worn out things, making things ourselves, refurbished furniture and woods, etc. I am also really thankful that he is gifted at building. It had been a wonderful asset to our lives even in the mere year we've been married. So when I told him I wanted to build some shelves above our bed with my birthday money he was immediately on board.
First step: Find the right wood.
We have this awesome Habitat for Humanity Restore right up the road from us and we go there first for all of our building needs. I wanted some worn wood that had character. The downside to such a store is you never know what they will and will not have. We were lucky and they had the perfect board.
$4. no tax
Second step: brackets. I knew I wanted some rod iron brackets but I wasn't sure where to buy them. We looked online and in a few stores but I went with some from Hobby Lobby. They were only $6.99 plus they were 50% off. Cheap! We ought 4 (2 for each shelf)
$14, plus tax
Then, using painters tape, we mapped it out on the wall. We based it on the length of the board and how much space I wanted to take up on the wall. We were really anal about them being level because we used these lines as reference points for the bracket attaching.
Then, after deciding how far apart we wanted the brackets to be in respect to each other and the sides of the board, we put up the brackets. It is important to secure them well, Screws NOT nails, aim for a stud but if it just isn't possible, stabilize with dry wall anchors. It is helpful to know before hand if you will be hitting a stud or not. Simon bought a stud finder off of Amazon when he built the pipe shelf and we use it for almost all our projects. We spent about $7 on 1lb of screws (we only used 10 but it was the smallest amount we could buy; It was important to me that they were black. I didn't want them to stand out)
After we had attached the brackets for the first shelf, Simon cut the board accordingly with the circular saw. We don't have the ideal space for these kind of projects. A flat surface to cut on would have made the whole thing easier but he managed.

Then, after placing the board on the shelf, Simon drilled upwards to secure the board to the bracket.
Then we did the whole thing over again on shelf #2.
The spacing of the brackets. Initially I had planned on spray painting them a different color but once I saw them, I decided, in this room, they look nice just rusted and black. But I like the possibility of changing them later when we move if I want to.
Up close shot of the wood. One side of the wood-this side- was more worn than the other. Because of how high the shelves were, we decided to put the pretty side of the wood down to be seen. On lower shelves, obviously, we would have wanted it up.
Finished shelves with decorations.
Finally all put together!
Aslo, random side note. Don't expect to be able to burn candles if you put them on the top shelf. Fire hazard :)
Overall this project cost about $25. (not including decorations although several of them we already had) We are both pleased with the outcome. It is what I had hoped for!


