Tuesday, December 6, 2011

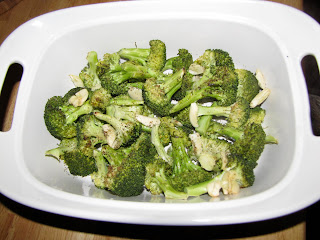
Cheddar Biscuits and Roasted Broccoli with Smashed Garlic

For Simon's Birthday I made a birthday dinner at home and I decided to try out a bunch of new recipes.  I  tend to stockpile recipes that I like until an opportunity arises.  I do realize, that making a meal of completely untested recipes (at least by us) could have been a disaster; But I am happy to report: no disaster occurred.  The whole thing was a bit more stressful than meals usually are but that was probably more due to pressure I put on myself rather than the complexity of the recipes.  
   So anyways, I decided not to put all of the recipes on here but, rather, just the two that were both simple and turned out really well!!  
Some background: Seafood- not my favorite.  But I always loved going to Red Lobster for the DELICIOUS cheddar biscuits that they serve all-you-can-eat style! I had heard they were pretty simple to make so I went hunting for a good copycat recipe and here's what I found.  Personally, I think they are  identical!

2 1/2 cups bisquick baking mix 
4 Tbsp cold butter
1 cup cheddar cheese, grated
3/4 cups cold whole milk
1/4 tsp garlic powder
Brush on top
2 Tbsp butter, melted
1/2 tsp garlic powder
1/4 tsp dried parsley flakes
1 pinch

Directionss
Preheat oven to 400°F.   
Combine Bisquick and cold butter. Don’t combine too thoroughly. There should be small chunks of butter about the size of peas.
Add cheddar, milk and 1/4 tsp garlic.
Mix by hand until combined, but don’t over mix
Drop 9 equal portions onto greased cookie sheet.
Bake for 15-17 minutes or until tops are light brown.
Melt 2 tbsp butter in a bowl. Stir in 1/2 tsp garlic powder and parsley flakes.
Use a pastry brush to spread garlic butter over tops of biscuits.


Now, for the Broccoli.  I LOVE vegetables but I don't really enjoy boiling them, so I try and find a variety of ways to make them in the oven while still keeping a lot of flavor.  Another thing that attracted me to this recipe is how few ingredients are needed and how low maintenance the whole thing is!


1 1/2 lbs broccoli florets, cut long with part of stem
6 cloves garlic, smashed
2 tbsp extra virgin olive oil
kosher salt and fresh pepper


Preheat oven to 450°. In a baking dish combine broccoli, olive oil, garlic, salt and pepper. Roast broccoli about 20 minutes, until broccoli is browned and tender.

We had the biscuits for an appetizer, broccoli, mashed potatoes and balsamic glazed skirt steak for the main course and strawberry cake for desert.  (I may put up the strawberry cake eventually because it was so hard to find a strawberry cake that didn't call for strawberry gelatin and/or a box cake mix).  

Tuesday, November 8, 2011

DIY Earings

Simon and I found a really neat little place in downtown little rock with a lot of random eclectic beads and things.  I really like to make jewelry so places like that are a lot of fun to look around and get ideas.
It was really different because there were just bowls here and there of one type of bead. It was kind of overwhelming, something different wherever you turned, but if you like that kind of "shopping" or are in to jewelry making i would definitely point you in that direction!   
You can find them on facebook too. Argenta Bead Co

Here is a picture of the countless bead bowls I was talking about.  

So anyways, I found some cute flower beads with rounded backs which makes them perfect for making beads into earrings. 
I feel like these days everyone is into dangly earrings and my ears don't do dangly earrings anymore (one too many pairs of those ridiculous oversized hoops in junior high I would suspect).  So anyways, I stick to studs and I can never find cute ones that I like.  
This is one really easy and inexpensive way that I can have stud earrings that are exactly what I am looking for.  


 Okay, so here's what I used.  Those little empty earring posts are so so cheap.  I think they were 5 cents apiece.  They came with the backs too, somehow those didn't make it into the picture.  
That LOCTITE super glue is wonderful!  The twist top is the best I've ever used.  Most super glue allows for one time use because after that the top is glued shut.  Not this one though!  


This process is pretty self explanatory but just put a dab of glue onto the post and press it tight into the center of the earring for 10-15 seconds and then let it dry untouched for about 10 minutes.


Here is the final product up close.  The backings have stayed on great so far.  They are sturdy and the glue dried clear.

Sunday, November 6, 2011

Sandwich Bread in Bread Machine

We've been looking for a bread recipe that would take the place of our store bought sandwich bread.  The our first attempt was with a Honey Oat Wheat Bread.  The bread was good but not at all ideal for sandwiches because it was really crumbly and unstable.  
So I literally googled "sandwich bread in bread machine" and a blog came up by a girl who is on a low budget and wanted a good sandwich bread that didn't fall apart.  Perfect!  So I tried it and it really is the best sandwich bread.  I mean we were looking for something that was similar to the typical kinda squishy, lightly browned sandwich bread from the store, not necessarily the ideal bread for every occasion.  So I thought I would share my discovery.  

Ingredients: 
1 1/3 cups warm water
2 tsp salt
1/3 cup olive oil.  (Not the same with veg. oil)
1 1/2 cups whole wheat flour
2 1/2 cups bread flour
2 Tbsp and 2 tsp sugar
3 tsp yeast

Directions:
In bread machine combine water, salt and oil. 
Add both flours atop liquid ingredients- 
spread it out so it is a barrier between the liquid ingredients and what you will add next  
In one corner of bread machine add sugar
Make a little well or whole in the middle of the flour surface and place yeast in the whole

[[I like making the dough in the machine and then baking the bread in a bread pan in the oven so that is how these directions are aimed.  If you prefer to make the whole thing in the bread machine-which is how the original blog post recipe was done- just set the bread machine to bake and select light ]]

Back to the recipe::
Set bread machine to dough cycle.  
After the cycle is complete (about an 1 hour and 20 minutes) remove dough and put into a lightly greased bread pan and allow to rise for about 1 hour.
Then, bake for 30-40 minutes on 300 degrees.  

From bread maker to bread pan-Don't let the clumpy texture fool you, the rising will fix that.

Risen bread before it goes into the oven.

The bread dumps right out of the pan, no hassle!

Here is a picture of the "perfect sandwich slices" that we are so excited about!!
We are on our second loaf.  Between breakfast toast and sandwiches the two of us went through a loaf in less than a week.  But I'm going to try and keep up with one a week so we probably need to slow down on our bread eating.  The blog post had an update saying she tried it with sunflower oil rather than olive oil and she thought it was even better.  I don't have sunflower oil so I decided to just go with EVOO until I was sure I would be making it regularly.  So, I can't speak for the update yer but that is the baker's tip.  


Saturday, October 29, 2011

Strawberry- Pineapple Smoothie

We decided to have Smoothies for dinner so we searched for a new recipe.  I found a Strawberry-Pineapple smoothie in Allrecipes.com and then we tweaked it a little bit and doubled the amounts so this is the DOUBLED RECIPE.  

    • 2 cups frozen strawberries
    • 1 cup milk
    • 1/2 cup of coconut milk
    • 1-1/2 cups pineapple juice
    • 1 cup vanilla yogurt
    • 1/4 cup white sugar
    • 12 ice cubes

    • Place everything in a blender and blend until smooth
    (the original recipe did not have any coconut milk but rather, 1 1/2 cups milk)
    Also, we accidentally left out the sugar but it was really good without it so I'm not sure if I want to really try it with the sugar next time or rather just enjoy the less sweet version.  


 We bought the 6 pack of little cans of pineapple juice, even thought it's a little more expensive, so we would be able to enjoy the remaining juice at our own pace rather than have to hurry to drink it before it spoils.
.

  • Here is what our doubled version made in total.  The plastic bottle is about 20 fl oz and the glasses, about 16 each.  
  • The glass alone wasn't quite enough to hold us so we had some toast and jelly to make it a more filling meal.

Tuesday, October 18, 2011

Magazine Holder from Reclaimed Wood

A couple of weeks ago, Simon and I found a weathered pallet in the "Free: Please take me" pile in a front yard.  Everyone has passed those in their neighborhood.  I've noticed that you see those unwanted piles often on Sundays - people do their weekend cleaning on Saturdays I suppose.  We've found a lot of really good stuff in piles like that so I've gotten into the habit of checking them out whenever I notice them.

We almost passed it up because we don't really have the room to just keep wood until we need it.  I remembered though that I had been looking to buy a magazine holder of some sort.  We have so many magazines from Good Housekeeping, Southern Living and some other random things that I like using for recipes and what not that it was becoming a little ridiculous.  So Simon went back and loaded it into the car.  Later that evening, our magazines had a home!  


It's about 1'x1'x1.5'


We bought some rope that we thought looked equally worn at Lowe's. Rope can actually be pretty expensive so we limited to ourselves to the options that could be bought by the foot, but they had exactly what we wanted so it was perfect!


Friday, October 14, 2011

Pumpkin Spice Cupcakes

I've been planning to make Pumpkin cupcakes whenever the fall season came around and now that it is here I had to find the right recipe.  Then I saw the cover of a November Family Circle Magazine with cupcakes that looked like pumpkins too!

 I thought that was really cute so I decided to put the two together.  


Mix flour, baking powder, baking soda, cinnamon and pumpkin pie spice together in a bowl and set aside.  (The original recipe called for 2 tsp cinnamon, 1/4 tsp nutmeg, and 1/4 tsp ground cloves but because I had the pumpkin pie spice from making the pumpkin spice lattes, after comparing the substitutes that recipe provided, I came up with the cinnamon and pumpkin pie spice ratios I used here).

 Then, in the bowl of a standing mixer combine pumpkin, sugar, brown sugar and oil.  


Add in eggs one at a time mixing well after each.  Then, in two portions, add flour mixture in.   

 Fill muffin pan with paper liners.  I always spray my paper liners, it makes the cupcakes come out of the wrappers neatly every time.  

Bake at 350 degrees for 18-20 minutes.  


 Now, for the SUPER orange icing!!  The amounts in the recipe made SO much more frosting that was needed.  I will almost cut that in half the next time - I may even keep the same amount of cream cheese for an extra strong flavor.  

It's hard to see in the picture, but I covered most of the cupcakes with orange crystal sprinkles, (If you are planning on using those for fall decorating, buy them early!! They go fast!) The pumpkin stems are the ends of giant pretzels. 
Well here they are:  My pumpkin pumpkin cupcakes.  The frosting in the recipe I used seemed to be much runnier than the type best for attempting a controlled icing process so I may try a different icing if I were to make the pumpkin designs again.  

Halloween-ing the Apartment

Decorating for holidays is one of my favorite memories as a kid and even since I've been in college I've decorated as much as I could.  Really the only ones I care much about are Halloween and Christmas as far as decorating goes.  Probably because those are the ones I remember the most about from decorating the house with my Mom.  
Our apartment doesn't allow for many decorations when it comes to storing them or putting them out.  So I decided that if I wanted any decorations I would have to make them from things that were already out.

I saw that Walmart was selling M&M's that were candy corn colors.  We also had several empty glass bottles that we were using for decoration.  So here was my first Halloween decoration idea: 


A lot of our picture frames are black so I figured I could use that to my advantage in this situation.  I took out the picture and made a little Halloween drawing on some green construction paper from my scrap booking box with a sharpie.  Then i added some floating eyeballs to the edges with double sided tape.
  
These things placed around the living room combined with a medium sized pumpkin we bought made the house look a little more festive.